About
LVM (Logical Volume Manager) is a powerful Linux feature that adds a layer of abstraction between the physical partitions on your system and the filesystems that they store. Partitions managed by LVM are called a physical volumes, which are combined together to form volume groups. From each volume group logical volumes can be created, on which filesystems are actually stored. The size of each volume group is the sum of the sizes of all its physical volumes. This space can be handed out to as many logical volumes as will fit into it, so that it could contain many small logical volumes or one huge one that spans multiple physical volumes (and thus partitions).
At first glance, LVM may seem to be not much more powerful than software RAID, which can also combine multiple partitions into one large filesystem. However, it gives you far more freedom to carve up disks into separate filesystems that may take up part of a disk, several disks or anything in between. The only down side is that LVM does not support redundancy as RAID does in levels 1 and 5.
The most useful feature of LVM is the ability to re-size logical volumes and the filesystems within them, up to the amount of free space in the volume group. Additional physical volumes (such as newly installed hard disk partitions) can be added to an existing volume group, increasing the amount of free space. For example, if your system had two hard disks whose partitions were combined to form a volume group, you might have a filesystem on a logical volume that is as big as both disks combined. If you began to run out of disk space and wanted to enlarge the filesystem, you could install a new hard disk, add it to the volume group and then enlarge the logical volume to make use of all the new free space! This is far more convenient than mounting the new hard disk as a subdirectory somewhere under the existing filesystem.
Physical volumes can also be removed from an LVM volume group, as long as there is enough free space in the group to store data that used to be on the physical volume. This means that you could theoretically remove a small hard disk from your system and replace it with a larger one, without having to manually copy files around.
The module
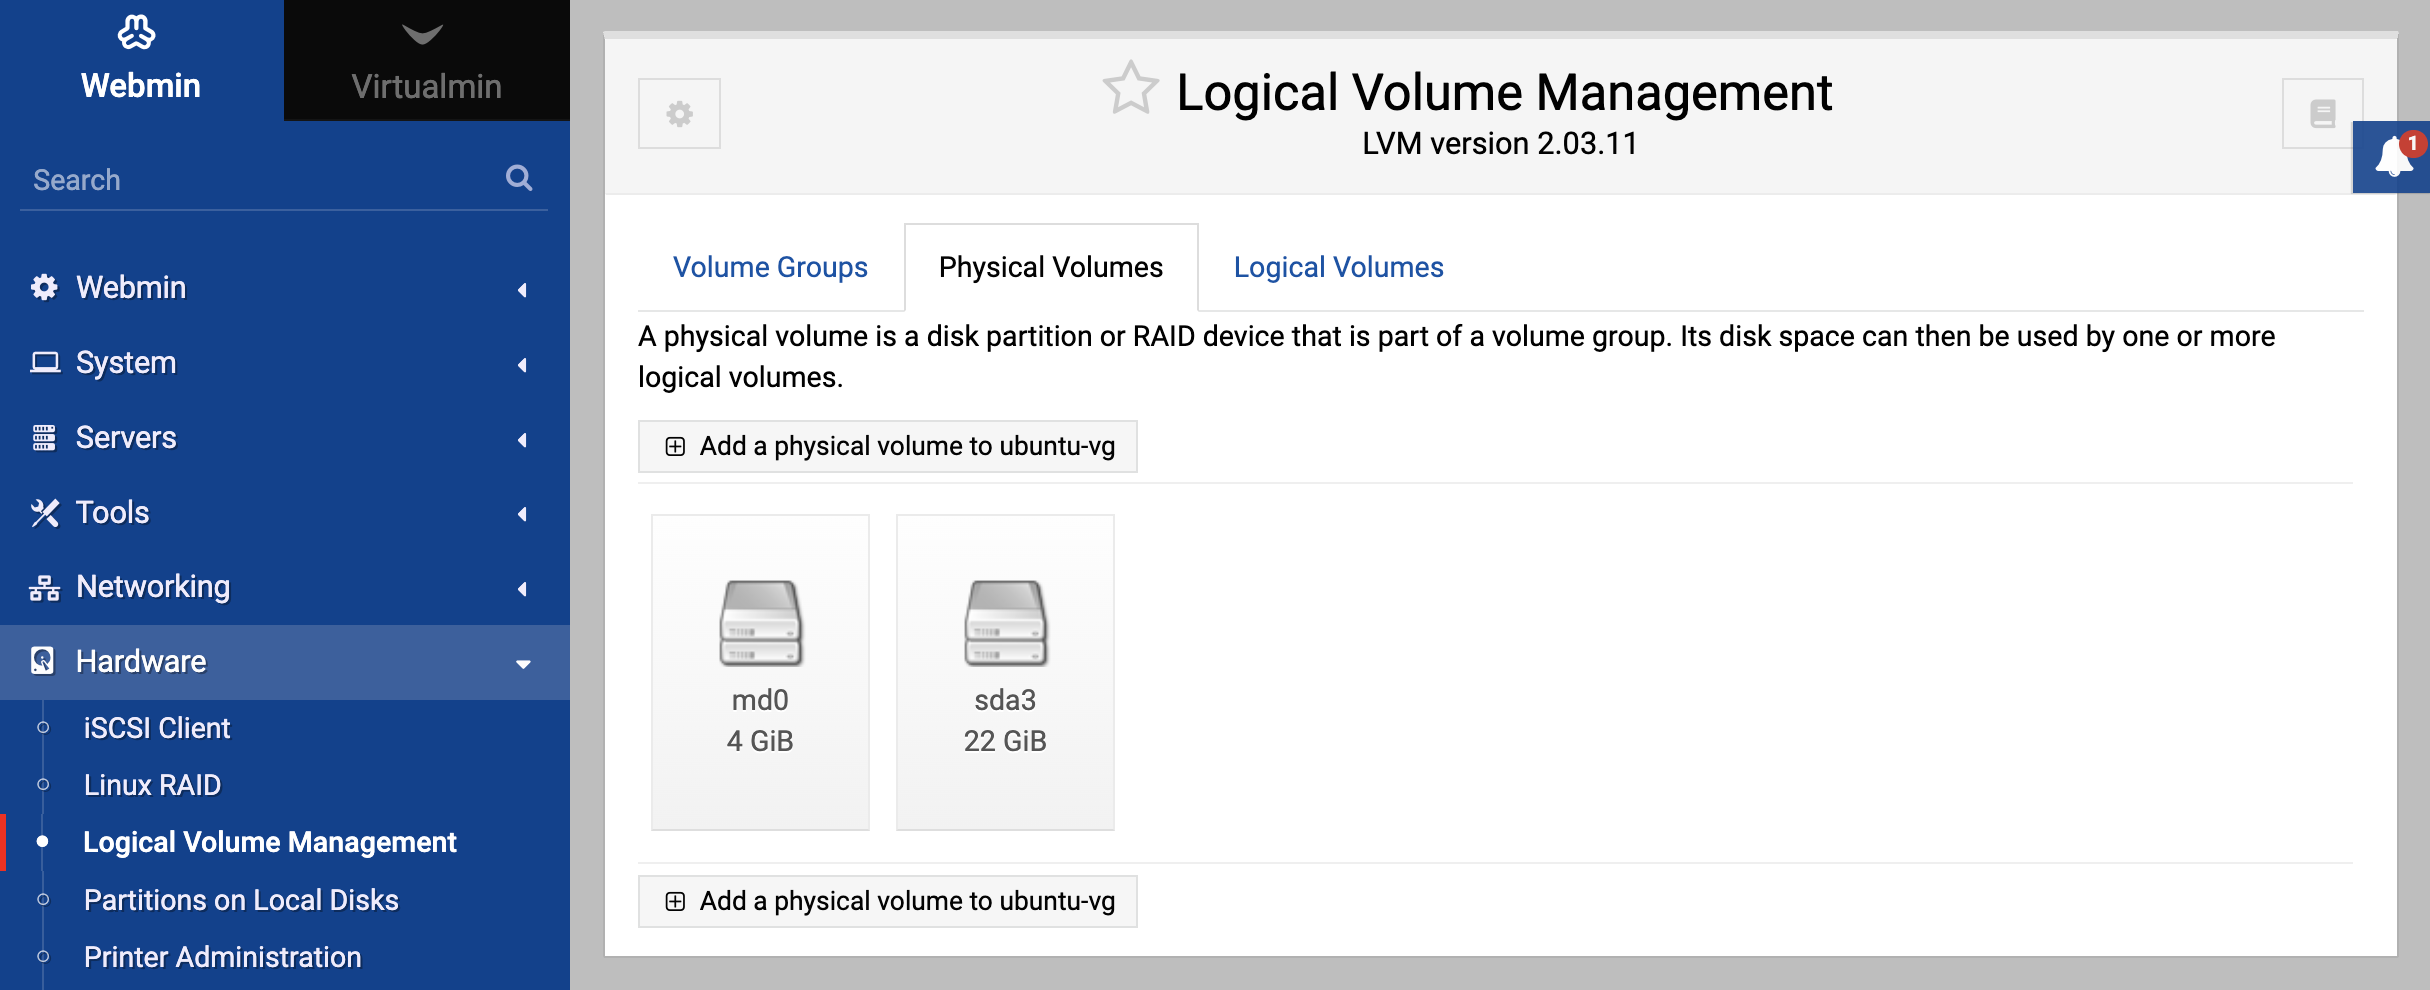
Webmin’s Logical Volume Manager module allows you to perform almost all of the tasks that can be done using the command-line LVM tools. When you enter the module from the Hardware category, the main page shows tabs for volume groups and their physical and logical volumes.
Because the module depends upon the LVM tools such as vgcreate, the main page will display an error message if they are not found.
Volume groups
Assuming you have at least one partition free for use by LVM, setting up a new volume group is easy. Even if you do not intend to use different groups you have to create at least one group.
The process to follow is:
- In the Partitions on Local Disks module, change the types of any partitions that you want to include in the volume group to Linux LVM. Trying to use partitions of any other type will fail.
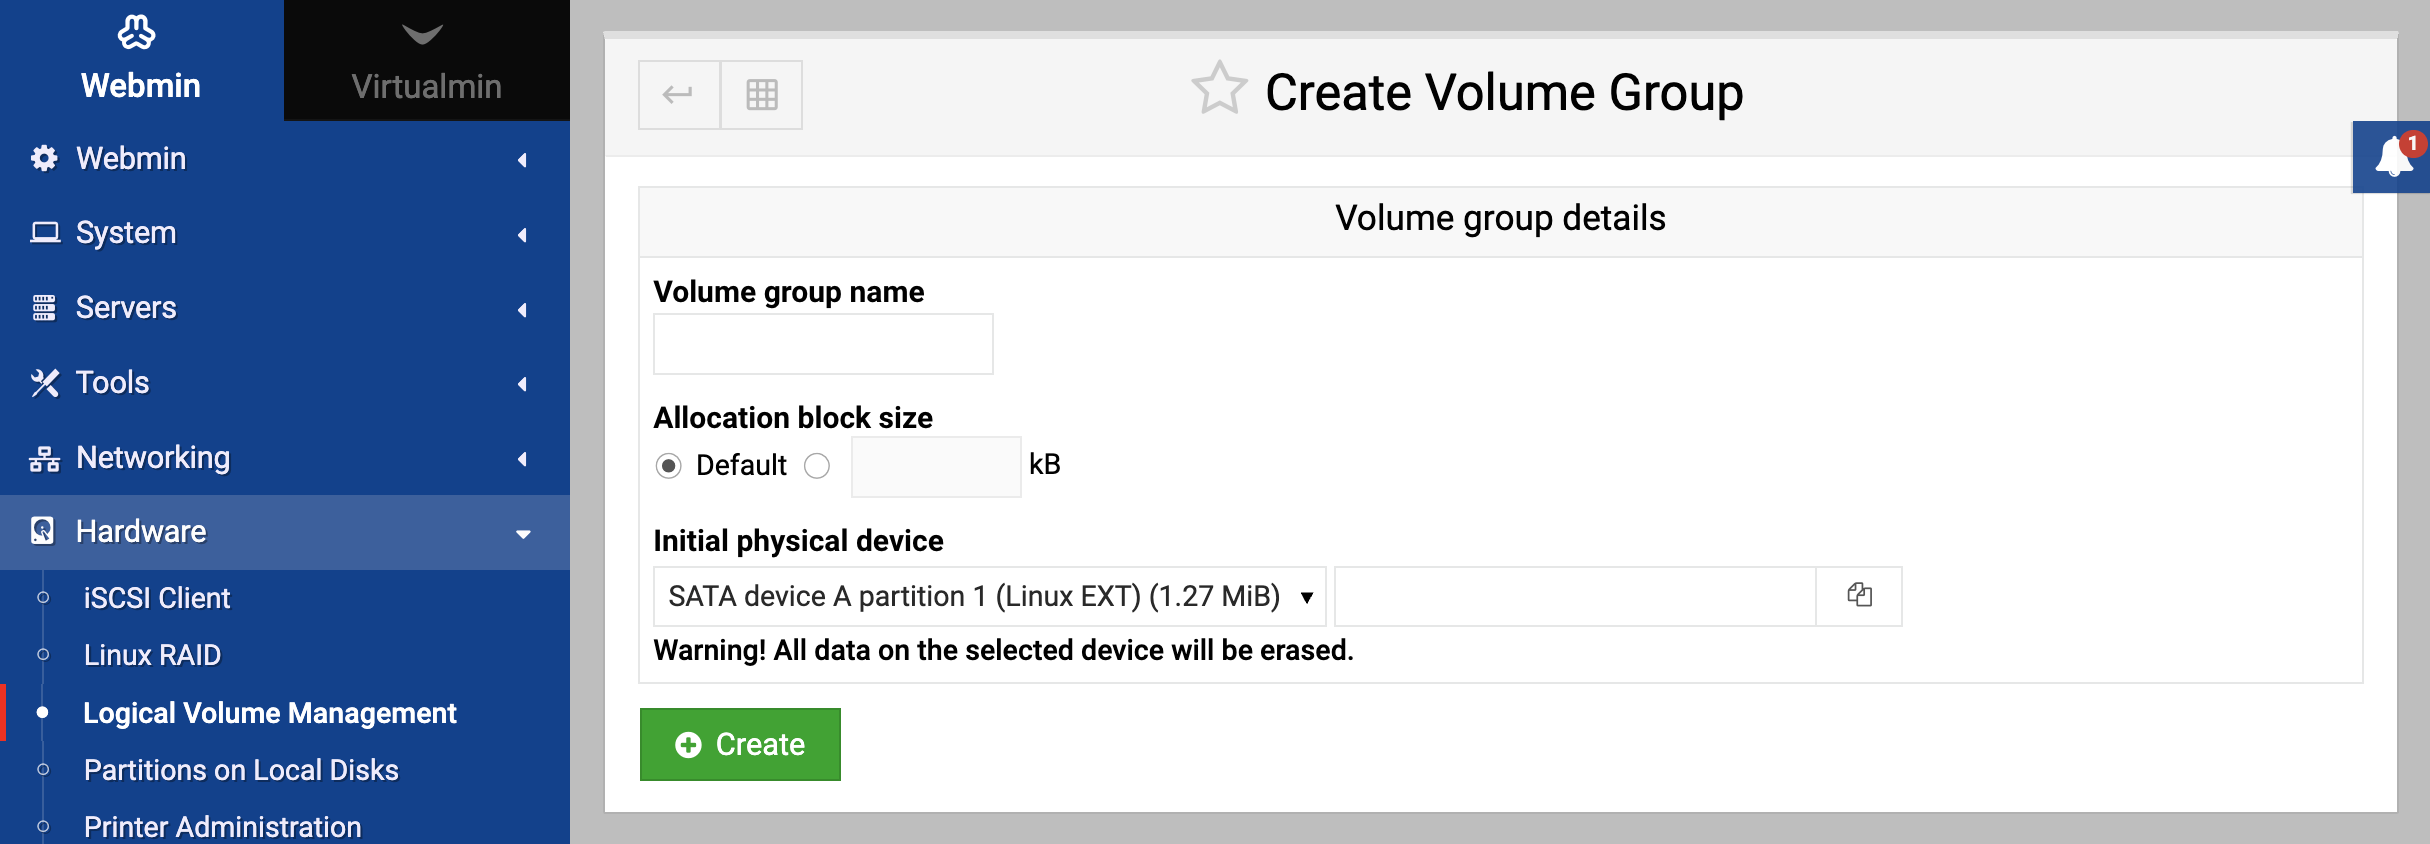
- Back in the Logical Volume Manager module, click on the Add a new volume group link, which will take you to the volume group creation form.
- Enter a name for your new volume group in the Volume group name field. This should be short and contain no spaces, like
data_vg. - Select the initial partition to be included in your volume group with the Initial physical device field. Only partitions or Linux RAID devices that Webmin determines are not in use will appear in the list. You also specify a partition by device file name by selecting the Other option and entering the file name into the field next to it. If Other is the only option available, Webmin has not detected any partitions free for use by LVM. Be aware that any data on the partition or device that you select will be lost forever, even if the volume group is not actually used.
- Click the Create button. If all goes well, you will be returned to the main page of the module and your volume group with its initial physical volume will be displayed.
- To add more physical volumes to your new volume group, see the section below.
Physical volumes
Once a volume group has been created with its initial physical volume, you can add new partitions or (software) RAID devices to it at any time. This will increase the amount of free space in the volume group, and allow you to create more logical volumes or extend existing ones.
To add a physical volume, follow these steps:
- If you are adding a disk partition, use the Partitions on Local Disks to create a Linux ext partition.
- On the main page of the Logical Volume Management module, click on Add a physical volume to the group inside the section for the appropriate volume group. This will take you to a page for selecting the partition or RAID device to add.
- Choose the one that you want to add from the list in the Disk device field, or select the Other option and enter a device file manually. Only partitions that Webmin thinks are not in use elsewhere will be available for selection. Be aware that any data on the partition or device that you select will be lost forever.
- Click the Add to volume group button to add the physical volume. If successful, you will be returned to the main page of the module.
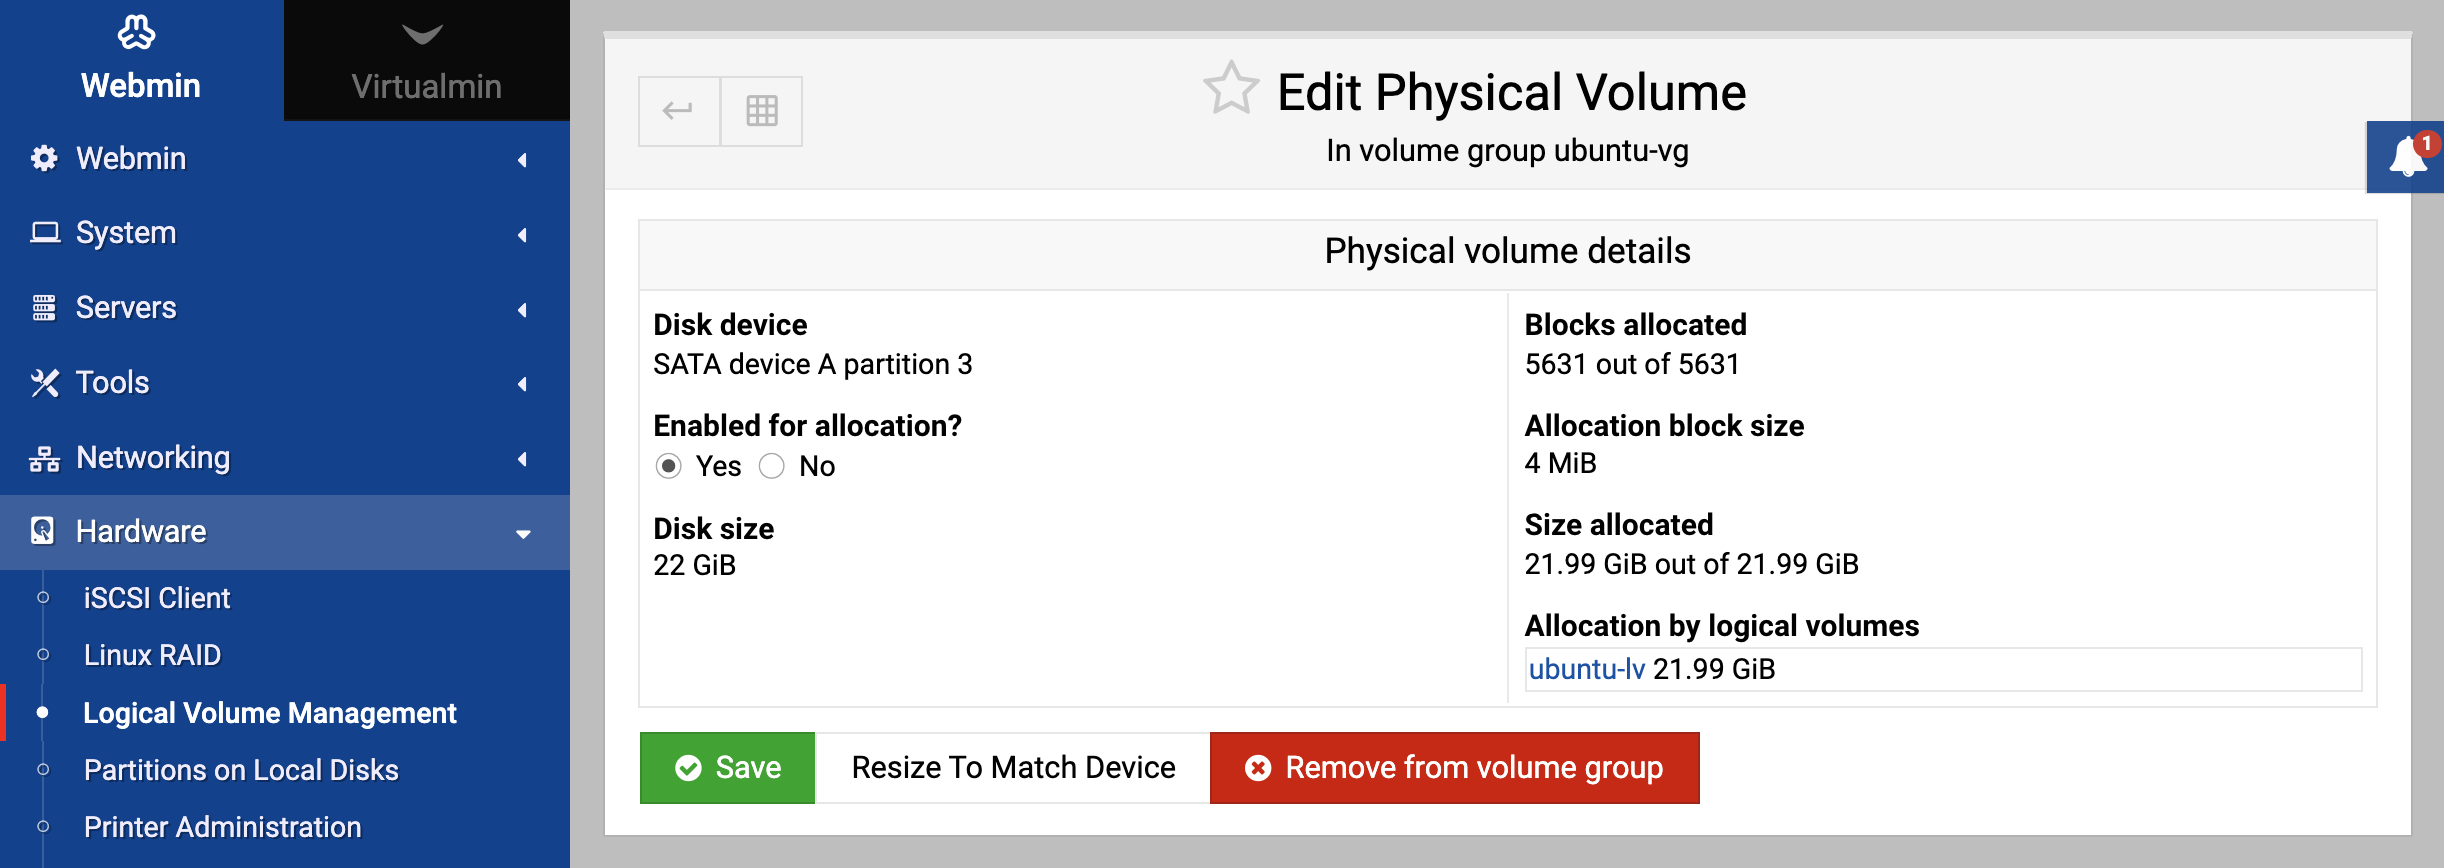
It is also possible to remove a physical volume from a volume group, as long as there is enough free space in the group to store all the data that was previously on the physical volume. The steps for doing this are:
- On the main page, click on the icon for the physical volume that you want to remove.
- Click the Remove from volume group button. Assuming that removal is possible, there may be a delay as data is shifted to other physical volumes.
- Once the removal is complete and the browser returns to the list of volume groups, you can immediately use the partition for mounting, RAID even adding to another volume group.
Logical volumes
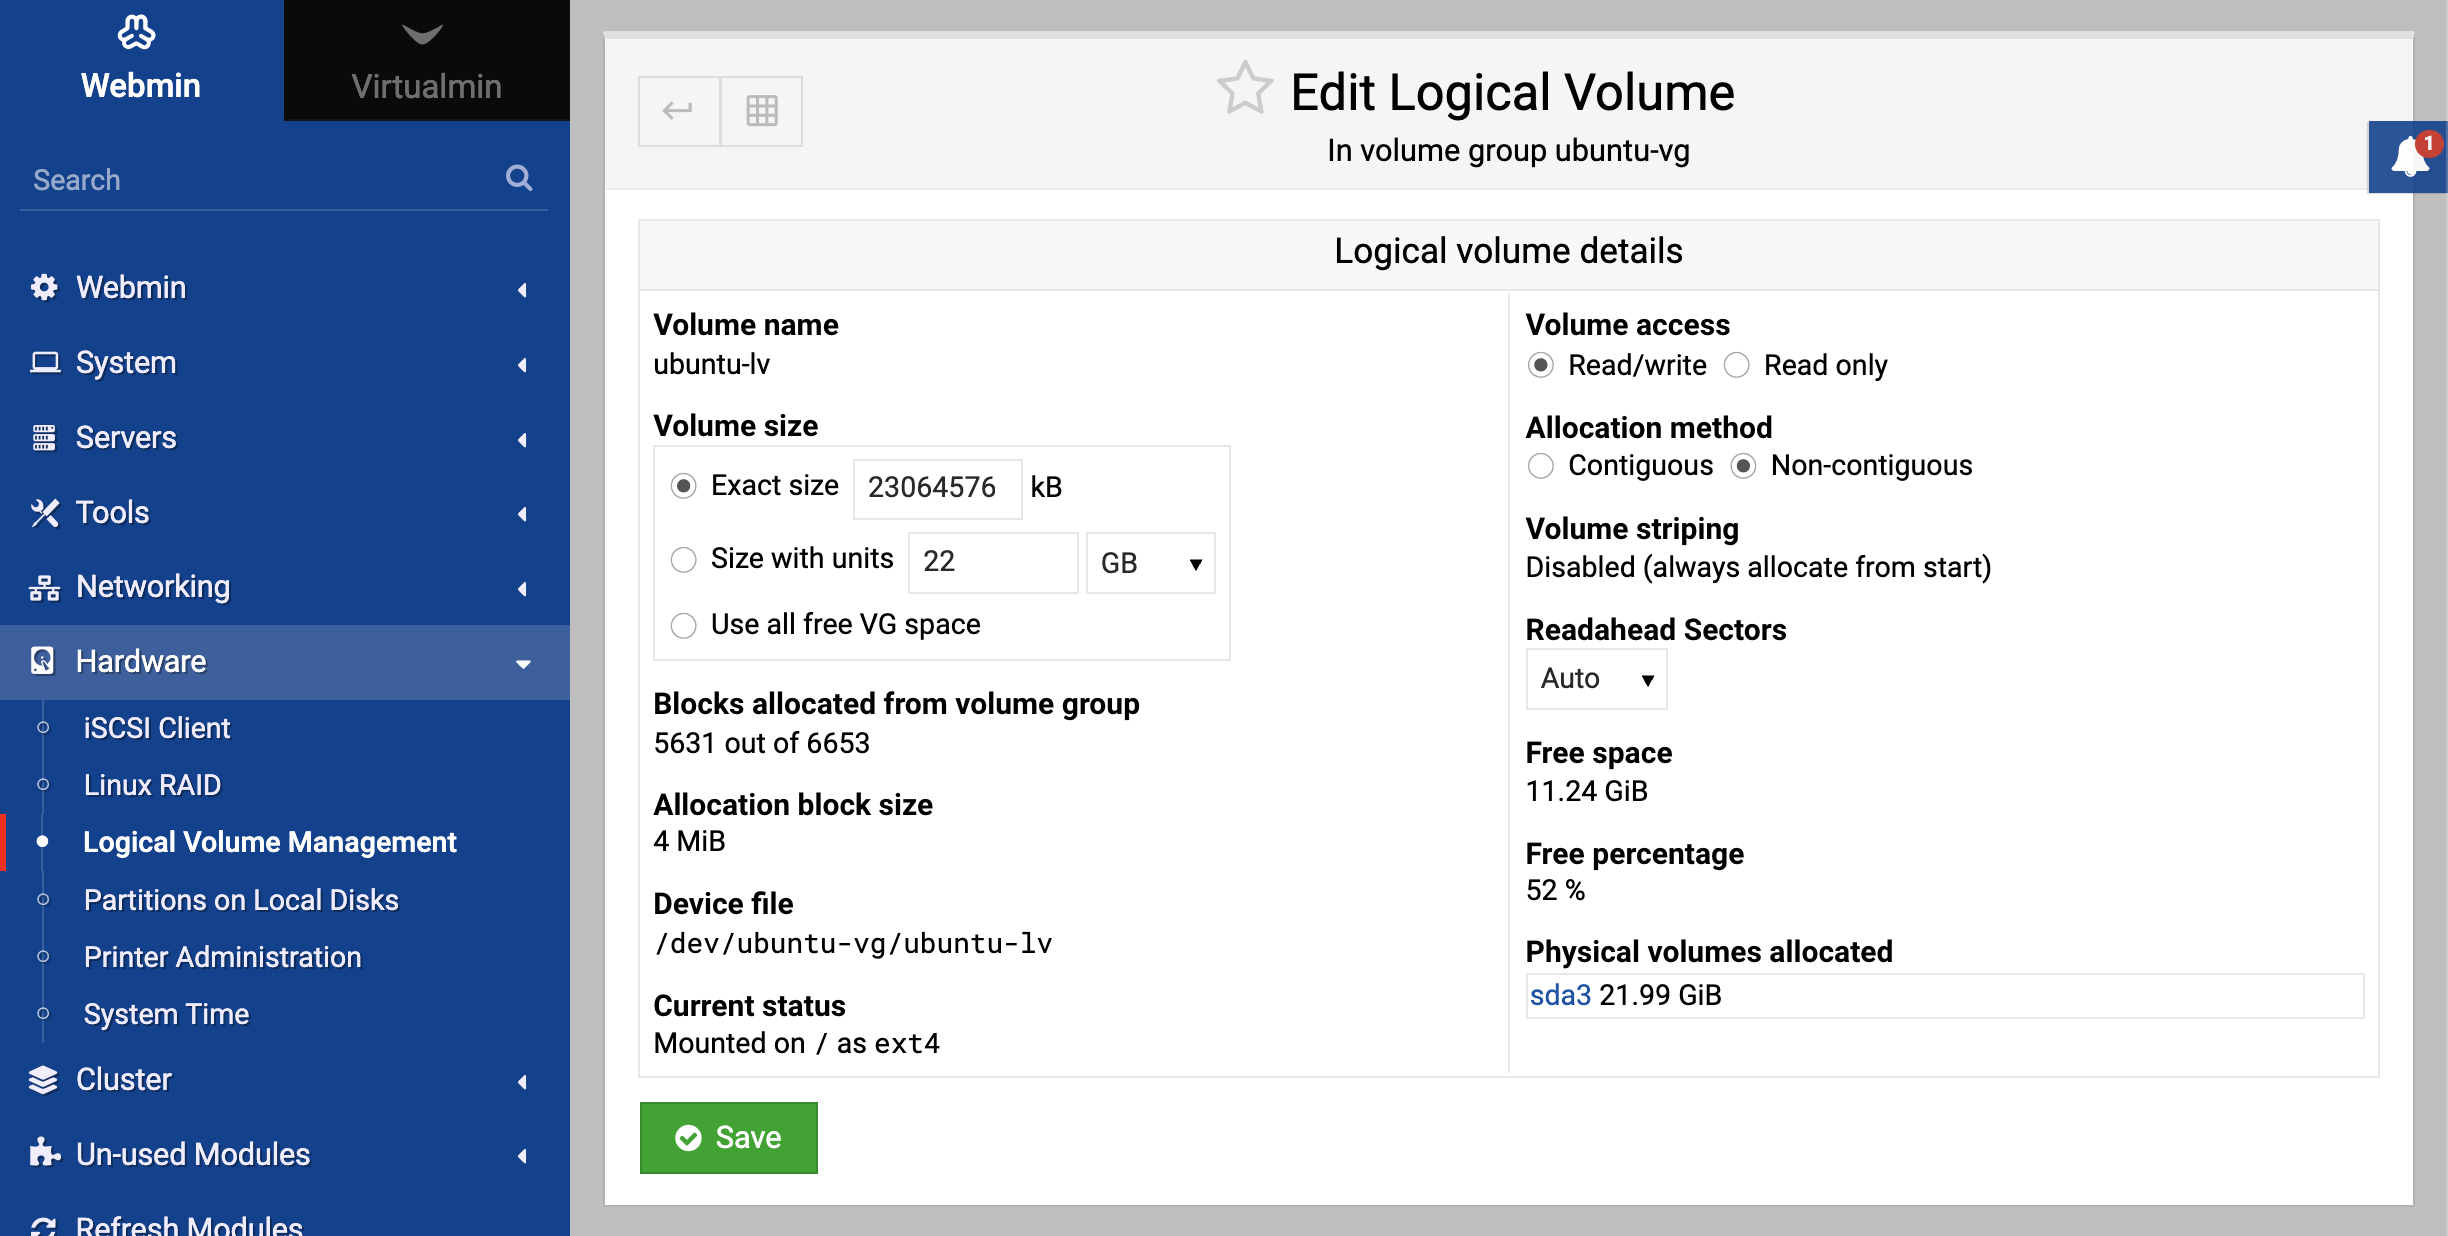
As long as a volume group has some free space, you can add a logical volume to it at any time. A logical volume can be any size, but the size will always be rounded up to a multiple of the allocation block size used by the volume group (4 MB by default). You can see the current block size, blocks allocated and total blocks by clicking on a volume group’s icon on the main page of the module.
Add
The steps for adding a new logical volume are as follows:
- On the list of volume groups, click on the Create a new logical volume link next to the volume group that you want to add it to.
- In the Volume name field, enter a name for your new logical volume. This should be short and contain no spaces, like
data_lv. - For the Volume size field, enter the number of kilobytes to allocate to this volume. Whatever you enter will be rounded up to the nearest Allocation block size shown below. By default, this field will be set to the total amount of free space in the volume group.
- If the Allocation method option is set to Contiguous, all space reserved for this logical volume will be in one large block on disk. This can speed up access to the data, but is inflexible if you are adding and removing logical volumes causing the volume group to become fragmented. Therefore, it is usually best to leave the option set to Non-contiguous.
- The Volume striping option controls how data for the logical volume is layed out on disk. The Disabled option is similar to linear mode in RAID, while the Stripe across option is similar to striped mode. See the Introduction to RAID section for a more detailed explanation.
- When all the fields are set to your satisfaction, click the Create button. As long as all fields have been filled in properly and there enough free space in the volume group, the browser will return to the main page of the module and a new icon for your logical volume should be visible.
- Assuming you want to mount the new logical volume somewhere, you will first need to create a filesystem on it. To do this, click on its icon on the main page of the module which will take you to the logical volume editing page.
- Select the type of filesystem you want to create from the menu at the bottom of the page, and click the Create filesystem of type button.
- Select any options for the new filesystem, as explained in the Creating a new filesystem section. When done, click the Create button. A page showing the progress of the new filesystem’s creation will be displayed, which can take some time for large volumes.
- Assuming that the formatting is successful, you can now use the Disk and Network Filesystems module to mount the new filesystem.
Existing logical volumes can be deleted from their volume group, in order to free up space or reduce the volume group size. Before you can delete a logical volume, it must have been un-mounted in the Disk and Network Filesystems module. When it is deleted, any data that it contained will be lost forever.
Remove
To remove a logical volume, follow these steps:
- Click on its icon on the main page of the module, which will take you to the logical volume editing form.
- Click the Delete button. This will bring up a page asking if you are really sure about deleting it.
- Click Delete Now to confirm. Once it has been removed from the volume group, your browser will return to the main page of the module. The space freed up can be re-used for another logical volume immediately.
Resize
One of the most powerful features of LVM is its ability to enlarge or reduce existing logical volumes, even if they contain a filesystem. However, Webmin only supports the resizing of ext2, ext3, reiserfs and jfs filesystems at the moment 0 logical volumes formatted with other filesystem types (such as xfs) cannot be resized without losing data. You must also un-mount a logical volume before resizing it, and then re-mount afterwards - there is no way to resize a filesystem that is currently in use.
As would be expected, a logical volume can only be enlarged by the amount of free space in its volume group. When shrinking a logical volume containing a supported filesystem, its size cannot be reduced to less that the space occupied by files on the filesystem. Currently, jfs filesystems cannot be shrunk at all - only enlarged.
The steps to follow for resizing a logical volume are:
- In the Disk and Network Filesystems module, make sure the logical volume is unmounted.
- On the main page of the Logical Volume Management module, click on its icon which will take you to the volume editing form.
- Enter a new size in kB in the Volume size field. The size cannot be increased by more than the amount of free space in the volume group, or reduced to less that the space occupied by files on the filesystem unless you plan to re-create the filesystem.
- Click the Save button. When resizing a volume containing an
ext2,ext3,reiserfsorjfsfilesystem, as long as no problems are encountered you will be returned to the main page of the module. However, if the filesystem could not be shrunk below the amount of space occupied by its files, an error page will appear offering you the option of resizing anyway. Clicking the Resize Logical Volume button will force a resize, but any files on the volume will be lost and you will need to re-create the filesystem. If resizing a logical volume containing some other type of filesystem (such asxfs) or one whose contents are unknown to Webmin, a page asking you to confirm the resize will appear. If you click the Resize Logical Volume to go ahead, any filesystem on the volume will be lost and need to be created again. - If the filesystem was resized successfully, you can re-mount it in the Disk and Network Filesystems module. Otherwise, you will need to re-create it as explained above.
Snapshot
A snapshot is special kind of logical volume that is actually a temporary read-only copy of another volume. When a snapshot is created, it appears to contain a copy of all the data in the source volume, so that if the source is changed the snapshot remains the same. In order to save on disk space, the snapshot really only stores data that has changed on the original logical volume since it was created. This makes it possible to create a snapshot copy of a 100 MB volume even if the volume group has less that 100 MB of free space.
Snapshots are useful for quickly freezing a filesystem at some point so that it can be safely backed up. A snapshot can even act as a kind of backup itself, which you can revert to if something goes wrong with files on the original volume. The only down side is that a snapshot can only be safely created when the source logical volume is un-mounted, as a mounted filesystem will not be in a valid state for copying.
To create a snapshot, follow these steps:
- In the Disk and Network Filesystems module, un-mount the filesystem on the original logical volume if necessary.
- Back in the Logical Volume Management module, click on the Create a new snapshot link in the same volume group as the original volume.
- On the snapshot creation form, enter a short name without spaces into the Volume name field, like
data_snapfor example. - For the Volume size, enter the amount of disk space in kB that you want to allocate to this snapshot for storing differences made to the original logical volume after the snapshot was created. If the amount of space is too small and too many changes are made to the logical volume, I/O errors will start to occur when reading files in the snapshot filesystem.
- For the Snapshot of logical volume field, select the logical volume that you want to make a copy of.
- Click the Create button to create the snapshot and return to the main page. An icon for your new snapshot will appear among the other logical volumes in its volume group.
- In the Disk and Network Filesystems module, re-mount the filesystem on the original logical volume. You can mount the filesystem on the snapshot separately here as well.
Once created, a snapshot can be resized in the same way that you would resize a normal logical volume. However, this does not resize the filesystem on the snapshot - instead, it changes the amount of space available for storing differences between the snapshot and original volume group. A snapshot can also be deleted, assuming the filesystem on it has been un-mounted first. Any data in the snapshot will be lost, but since it is just a copy of another volume this isn’t likely to matter much.
Certainly! Let’s delve into the Linux Logical Volume Manager (LVM) with some detailed command-line examples.
LVM creation with CLI examples
Physical Volumes (PV)
Before creating volume groups or logical volumes, we first need to initialize physical volumes.
Command: pvcreate
# Initialize two disks for use by LVM
pvcreate /dev/sda1 /dev/sdb1
To list all PVs: pvdisplay
Volume groups (VG)
Once we’ve set up our physical volumes, the next step is to create a volume group from one or more PVs.
Command: vgcreate
# Create a volume group named "myvg" using two physical volumes
vgcreate myvg /dev/sda1 /dev/sdb1
To list all VGs: vgdisplay
Logical volumes (LV)
With a VG in place, we can now carve out logical volumes from the space provided by the VG.
Command: lvcreate
# Create a logical volume of 10GB named "mylv" from the volume group "myvg"
lvcreate -L 10G -n mylv myvg
To list all LVs: lvdisplay
Resizing logical volumes
LVM provides flexibility in resizing volumes:
To extend an LV:
# Add 5GB to "mylv"
lvextend -L +5G /dev/myvg/mylv
To reduce an LV (CAUTION: Ensure data safety first!):
# Reduce "mylv" by 5GB
lvreduce -L -5G /dev/myvg/mylv
Removing LVM components
If you wish to remove LVs, VGs, or PVs:
To remove an LV:
lvremove /dev/myvg/mylv
To remove a VG:
vgremove myvg
To remove a PV (after VGs on it are removed):
pvremove /dev/sda1


